Anaconda Navigator & Pyhton & Others Anaconda Navigator 介绍 / 背景 conda anaconda anaconda-navigator pip virtualenv区别
Anaconda是一个包含180+的科学包及其依赖项的发行版本。其包含的科学包包括:conda, numpy, scipy, ipython notebook等。
conda是包及其依赖项和环境的管理工具。
pip是用于安装和管理软件包的包管理器。
virtualenv:用于创建一个独立的 Python环境的工具。
“Anaconda-Navigator”中已经包含“Jupyter Notebook”、“Jupyterlab”、“Qtconsole”和“Spyder”。
conda基础操作 1 2 3 4 5 6 7 8 9 创建环境 conda create -n envname python=xxx 删除环境 conda remove -n envname --all 进入环境 conda activate envname (old version: source activate xxx) 离开环境 conda deactivate (old version: source deactivate) 列出所有环境 conda info -e
conda参数 1 2 3 4 5 6 7 8 9 10 11 12 13 14 15 16 17 18 19 20 conda install -y 覆盖提示,默认yes The following NEW packages will be INSTALLED: libgfortran: 1.0-0 numpy: 1.10.2-py27_0 openblas: 0.2.14-3 pandas: 0.17.1-np110py27_0 python-dateutil: 2.4.2-py27_0 pytz: 2015.7-py27_0 six: 1.10.0-py27_0 Proceed ([y]/n)? y 等于提前输入了这个y ------------------- conda install -c 这个c的意思是channel,也就是指定了下载通道,在出现某些网络问题的情况下可以换一个下载源就这个意思 -------------------
conda install 和 pip install 的区别 1 2 3 pip只能安装python包,而conda可以安装由任何语言编写的包 pip不能创建虚拟环境,需要借助另外的包,例如virtualenv,而conda可以创建虚拟环境。 pip是按照python时自带的,而conda需要安装anaconda才能用。
具体区别可以在找个官网上找到 https://www.anaconda.com/blog/understanding-conda-and-pip
conda更新 很多时候打不开可能也是因为要更新了
管理员运行 conda promptconda update anaconda-navigator
第三步 anaconda-navigator --reset
第四步 conda update anaconda-client
第五步 conda update -f anaconda-client
Jupyter Book 使用技巧 端口
1 默认8888 值得一提的是如果同时开启jupyter book和jupyterlab需要小心端口冲突
快捷键
1 快捷键这里不过多介绍,因为我本身就是远程到windows机器上 `等待补充`
显示多行输出
1 Jupyter Book默认只显示一行输出,要想显示多行输出,需要添加如下代码
1 2 from IPython.core.interactiveshell import InteractiveShellInteractiveShell.ast_node_interactivity = 'all'
简易命令
1 2 不必离开Jupyter笔记本来执行Shell命令,而是可以在命令开头使用感叹号(!)。例如,您可以安装软件包。 !pip install matplotlib
大量魔术命令
1 2 魔术命令(magic commands)是有助于提高生产率的特殊命令。您可能最熟悉下面的魔术命令,该命令让Notebook渲染Python Matplotlib创建的图表。 %matplotlib inline
1 2 3 4 5 6 7 %pwd #打印当前工作目录 %cd #更改工作目录 %ls #显示当前目录中的内容 %load [在此处插入Python文件名] #将代码加载到Jupyter Notebook %store [在此处插入变量] #这使您可以传递Jupyter Notebooks之间的变量 %who #使用它列出所有变量 %lsmagic # 查看完整的魔术命令列表
记录单元格运行时间
显示函数文档
shift + tab
1 2 3 # 在Jupyter Book里面查看这个Book后面的Python版本的命令 import sys sys.version
Python python基础 1 2 print("Hello, Jupyter Book" )
1 2 3 import keywordprint(keyword.kwlist)
[‘False’, ‘None’, ‘True’, ‘and’, ‘as’, ‘assert’, ‘async’, ‘await’, ‘break’, ‘class’, ‘continue’, ‘def’, ‘del’, ‘elif’, ‘else’, ‘except’, ‘finally’, ‘for’, ‘from’, ‘global’, ‘if’, ‘import’, ‘in’, ‘is’, ‘lambda’, ‘nonlocal’, ‘not’, ‘or’, ‘pass’, ‘raise’, ‘return’, ‘try’, ‘while’, ‘with’, ‘yield’]
1 2 3 4 5 6 7 8 1.01 ** 365 print('-------' * 10 ) 10 / 20 9 // 2
37.78343433288728
----------------------------------------------------------------------
0.5
1 2 3 4 """ 多行注释 """ print("多行注释" )
'\n多行注释\n'
多行注释
1 2 3 4 5 account = 1101 print(type(account))
<class 'int'>
1 2 3 inputStr = input("记录输入" )
记录输入 (内容 )
int
1 2 3 4 5 6 7 8 9 10 11 12 13 14 name = "demo" print("我的名字叫 %s" % name) num = 1 print("学号是 %09d" % num) price = 8.5 weight = 7.5 money = price * weight print("苹果单价 %.2f元/斤 ,购买了 %.3f斤,需要支付%.4f元" % (price,weight,money)) scale = 0.8 print("数据比例是 %.2f%%" % (scale * 100 ))
我的名字叫 demo
1 2 3 import randomrandom.randint(10 ,20 )
16
1 2 3 4 5 6 7 8 9 10 11 row = 1 while row <= 5 : print("*" * row) row += 1 print()
1 2 3 4 5 6 7 8 9 row = 1 while row <= 9 : col = 1 while col <= row: print("%d * %d = %d" % (col, row, col * row ), end = "\t" ) col += 1 row += 1 print("" )
1 * 1 = 1
1 2 3 4 5 6 7 8 9 10 11 12 13 14 15 def multiple_table () : row = 1 while row <= 9 : col = 1 while col <= row: print("%d * %d = %d" % (col, row, col * row ), end = "\t" ) col += 1 row += 1 print("" ) multiple_table()
1 * 1 = 1
1 2 3 4 5 6 def sum_2_num (num1,num2) : result = num1 + num2 print("%d + %d = %d" % (num1,num2,result)) sum_2_num(50 ,20 )
50 + 20 = 70
1 2 3 4 5 6 7 8 9 10 11 12 13 14 15 16 17 18 19 20 21 22 23 24 25 26 27 28 29 30 lname_list = []
1 2 3 4 5 6 7 8 9 10 11 12 13 14 15 16 info_tuple = ("zhangsan" ,18 ) single_tuple = (5 ) type(single_tuple) single_tuple = (5 ,) type(single_tuple)
1 2 3 4 5 6 7 8 9 10 11 12 13 14 15 16 17 18 19 20 21 22 23 24 25 26 27 28 29 30 31 xiaoming = { "name" : "小明" , "age" : 18 , "gender" : True , "height" : 1.75 , "weight" : 75.6 , } print(xiaoming) print(xiaoming["name" ]) xiaoming["age" ] = 10 xiaoming.pop("age" ) zidian = {"key" : "value" } zidian.update(xiaoming) print(zidian) zidian.clear() print(zidian) for k in xiaoming: print("%s - %s" % (k, xiaoming[k]))
{‘name’: ‘小明’, ‘age’: 18, ‘gender’: True, ‘height’: 1.75, ‘weight’: 75.6}
10
{‘key’: ‘value’, ‘name’: ‘小明’, ‘gender’: True, ‘height’: 1.75, ‘weight’: 75.6}
1 2 3 4 5 6 7 8 9 10 11 12 13 14 15 16 str1 = "hello python" print(str1[0 ]) for k in str1: print(k) print(len(str1)) print(str1.count("o" )) print(str1.index("o" ))
h
p
1 2 3 4 5 6 7 8 9 10 11 12 13 14 15 16 17 18 19 20 num_str = "0123456789" num_str[2 :6 ] num_str[2 :] num_str[:6 ] num_str[:] num_str[::2 ] num_str[1 ::2 ] num_str[2 :-1 ] num_str[-1 ::-1 ] num_str[::-1 ]
1 2 3 4 5 6 7 8 a = 6 b = 100 a,b = (b,a) print(a) print(b)
1 2 3 4 5 6 7 8 9 10 11 12 num_list = [7 , 5 , 4 , 9 ] num_list.sort() print(num_list) num_list.sort(reverse=True ) print(num_list)
case:
1 2 3 4 5 6 7 def demo (num, *nums, **numss) : print(num) print(nums) print(numss)
1
1 2 3 4 5 6 7 8 9 10 11 12 13 14 15 16 17 18 19 20 21 22 23 24 run(1 ,2 ,3 ) def run (a,*args) : print(a) print(args) print("对args拆包" ) print(*args) print("将未拆包的数据传给run1" ) run1(args) print("将拆包后的数据传给run1" ) run1(*args) def run1 (*args) : print("输出元组" ) print(args) print("对元组进行拆包" ) print(*args)
1 2 3 4 5 6 7 8 9 10 11 12 def run (**kwargs) : print(kwargs) print("对kwargs拆包" ) run1(**kwargs) def run1 (a,b) : print(a,b) run(a=1 ,b=2 )
{‘a’: 1, ‘b’: 2}
1 2 3 4 5 6 7 8 9 10 11 12 13 14 15 16 17 18 19 20 21 22 23 24 25 26 27 28 29 30 31 32 33 34 35 36 37 38 39 40 41 42 43 44 45 46 47 48 49 50 51 52 53 54 55 56 57 58 59 60 61 62 63 64 65 """ __init__方法是专门用来定义一个类具有哪些属性的 """ class Cat : def __init__ (self, new_name) : print("初始化" ) self.name = new_name def eat (self) : print("%s 爱吃鱼" % self.name) def __del__ (self) : print("%s 我去了" % self.name) def __str__ (self) : return "我是小猫 %s" % self.name tom = Cat("TomDemo" ) print(tom.name) tom.eat() print(tom) """ 身份运算符 is is是判断两个标示符是不是引用同一个对象 is not is not 是判断两个表示服是不是引用不用对象 is 与 == 的区别 is用于判断两个变量引用对象是否为同一个 ==用于判断引用变量的值是否相等 """
初始化
1 2 3 4 5 6 7 8 9 10 11 12 13 14 15 16 17 18 19 20 21 22 23 24 25 26 27 28 29 30 31 32 33 34 35 36 37 38 39 40 41 42 43 44 45 46 47 48 49 50 51 52 53 54 55 56 57 58 59 60 61 class Animal : def eat (self) : print("吃" ) def drink (self) : print("喝" ) def run (self) : print("跑" ) def sleep (self) : print("睡" ) wangcai = Animal() wangcai.eat() wangcai.drink() wangcai.run() wangcai.sleep() class Dog (Animal) : def bark (self) : print("汪汪叫" ) wangwang = Dog() wangwang.eat() wangwang.drink() wangwang.run() wangwang.sleep() wangwang.bark() class XiaoTianQuan (Dog) : def fly (self) : print("我会飞" ) def bark (self) : print("我是啸天犬" ) super().bark() """ Dog.bark(self) """ print("aafsdwaerwgybds" ) xtq = XiaoTianQuan() xtq.bark()
1 2 3 4 5 6 7 8 9 10 11 12 13 14 15 16 17 18 19 20 21 22 23 24 25 26 27 28 class A : def __init__ (self) : self.num1 = 100 self.__num2 = 200 def __test (self) : print("私有方法 %d %d" % (self.num1, self.__num2)) class B (A) : def demo (self) : print("访问父类的私有属性 %d" % self.__num2) b = B() print(b) """ 在外界不能直接访问对象的私有属性,调用方法 print(b.__num2) b.__test() """ print(b.num1) b.demo()
1 2 3 4 5 6 7 8 9 10 11 12 13 14 15 16 17 18 19 20 21 22 23 24 25 26 27 28 29 30 31 32 33 34 35 36 37 38 class C : def test (self) : print("test 方法" ) class D : def demo (self) : print("demo 方法" ) class E (C, D) : pass e = E() e.test() e.demo() """ python中多继承两个父类出现相同的方法 属性名的时候 使用MRO选择执行顺序的 """ print(E.__mro__) """ 新式类 以Object为基类的对象 旧式类 不以Object为基类的对象 两者在多继承时 会影响到方法的搜索顺序 """
test 方法
1 2 3 4 5 6 7 8 9 10 11 12 13 14 15 16 17 18 19 class Woman : def __init__ (self, name) : self.name = name self.__age = 18 def secret (self) : print("%s 的年龄是 %d" % (self.name, self.__age)) xiaofang = Woman("小芳" ) print(xiaofang.__age) print(xiaofang._Woman__age) xiaofang.secret()
1 2 3 4 5 6 7 8 9 10 11 12 13 14 15 16 17 18 19 20 21 22 23 24 25 26 27 28 29 30 31 32 33 34 35 36 """ __init__ 为对象初始化 实例方法(self) 类对象 模版 只有一个 实例对象 可以有很多个 """ class Tool (object) : count = 0 def __init__ (self, name) : self.name = name Tool.count += 1 @classmethod def show_tool_count (cls) : print("工具对象的数量 %d" % cls.count) tool1 = Tool("斧头" ) tool2 = Tool("榔头" ) Tool.show_tool_count()
1 2 3 4 5 6 7 8 9 10 11 12 13 14 15 16 17 18 19 20 21 22 23 24 25 26 27 28 29 30 31 32 33 34 35 36 37 38 39 40 41 42 43 44 45 46 47 48 49 50 51 52 53 54 55 56 57 58 59 60 61 62 63 64 65 66 67 68 69 70 71 72 73 74 """ python 中的self和cls一句话描述:self是类(Class)实例化对象,cls就是类(或子类)本身,取决于调用的是那个类。 __new__ 为对象分配空间 返回对象的引用 python获得了对象的引用后,将引用作为第一个参数,传递给__init__方法 重写__new__方法的代码非常固定 如下 """ class MusicPlayer (object) : def __new__ (cls, *args, **kwargs) : print("创建对象,分配空间" ) instance = super().__new__(cls) return instance def __init__ (self) : print("播放器初始化" ) player = MusicPlayer() print(player) """ 单例:让类创建的对象,在系统中只哦与唯一的一个实例 """ print("--------完整单例-------" ) class SingleMusicPlayer (object) : instance = None init_flag = False def __new__ (cls, *args, **kwargs) : if cls.instance is None : cls.instance = super().__new__(cls) return cls.instance def __init__ (self) : if SingleMusicPlayer.init_flag: return print("初始化播放器" ) SingleMusicPlayer.init_flag = True player1 = SingleMusicPlayer() print(player1) player2 = SingleMusicPlayer() print(player2)
1 2 3 4 5 6 7 8 9 10 11 12 13 14 15 16 17 18 19 20 21 22 23 24 25 26 27 28 29 30 31 """ try: 尝试执行的代码 except: 出现错误的处理 """ try : num = int(input("请输入一个整数:" )) result = 8 / num print(result) except ZeroDivisionError: print("请输入正确的整数" ) except ValueError: print("请输入正确的整数" ) except Exception as result: print("未知错误 %s" % result) else : print("尝试成功" ) finally : print("总是会执行" ) print("-" * 50 )
1 2 3 4 5 6 7 8 9 10 11 12 13 14 15 16 17 18 19 20 21 22 23 24 25 26 27 28 29 30 31 32 33 """ 异常的传递 python 会把异常一直向上传递 """ def demo1 () : return int(input("输入整数:" )) def demo2 () : return demo1() print(demo2()) ''' ValueError Traceback (most recent call last) Input In [2], in <cell line: 47>() 43 def demo2(): 44 return demo1() ---> 47 print(demo2()) Input In [2], in demo2() 43 def demo2(): ---> 44 return demo1() Input In [2], in demo1() 39 def demo1(): ---> 40 return int(input("输入整数:")) ValueError: invalid literal for int() with base 10: 'dsf' '''
1 2 3 4 5 6 7 8 9 10 11 12 13 14 15 16 17 18 19 20 21 22 23 24 25 26 27 28 29 30 31 32 """ from package import sth from package import * """ """ __name__的用法 如果需要测试模块 就增加一个条件判断 这样增加了判断之后,在作为被包倒入的时候 下面的代码不会执行 """ """ 模版 # 导入模块 # 定义全局变量 # 定义类 # 定义函数 def main(): # ... pass # 根据__name__判断是否执行下方代码 if __name__ == "__main__" main() """
1 2 3 4 5 6 7 8 9 10 11 12 13 14 15 """ 包是一个包含多个模块的特殊目录 目录下有一个特殊的文件 __init__.py 包名的命名方式和变量名一直,小写字母+_ 好处 使用import 包名 可以一次性倒入包中所有的模块 在__init__.py文件中用 from . import 模块名 制定外部文件需要倒入的模块 """
1 2 3 4 5 6 7 8 9 10 11 12 13 14 15 16 17 18 19 20 21 22 23 24 25 26 27 28 29 30 31 32 33 34 35 36 37 38 39 40 41 42 43 44 45 46 """ 发布模块 三步 1. 创建setup.py """ """ 发布 固定模版: from distutils.core import setup # 多值的字典参数,setup是一个函数 setup(name="Hello", # 包名 version="1.0", # 版本 description="a simple example", # 描述信息 long_description="简单的模块发布例子", # 完整描述信息 author="FlyHugh", # 作者 author_email="flyhobo@live.com", # 作者邮箱 url="flymetothemars.github.io", # 主页 py_modules=["hello.request", "hello.response"]) # 记录包中包中包含的所有模块 """ """ 第二步 构建 python3 setup.py build """ """ 第三步 python3 setup.py sdist """ """ 安装 tar zxvf 解压 sudo python3 setup.py install 然后打开python3运行即可 """
1 2 3 4 5 6 7 8 9 10 11 12 13 14 15 16 17 18 19 20 21 22 23 24 25 26 27 28 29 30 31 32 33 34 35 36 37 38 39 40 41 42 43 44 45 46 47 48 49 50 51 52 53 54 55 56 57 58 59 60 61 62 63 64 65 """ python操作文件 open 打开文件 返回文件对象 read 文件内容读取到内存 write 将内容写入文件 close 关闭文件 文件指针 open()方法有两个参数 第二个参数制定的是打开的方式 存在r w a r+ w+ a+这些方式 用str格式传入 readline 按行读取 """ """ 小文件复制 file_read = open("README") file_write = open("README[复件]","w") text = file_read.read() file_write.write(text) file_read.close() file_write.close() 复制大文件 用readline """ """ 倒入 import os rename 重命名 remove 删除 listdir 目录列表 mkdir 创建目录 rmdir 删除目录 getcwd 获取当前目录 chdir 修改工作目录 path.isdir 判断是否是文件 """ """ python2.x 默认ASCII编码 python2 使用 # *-* coding:utf-8 *-* 来指定编码格式 python3.x 默认使用UTF-8 """
Python随机随到的一些问题,那你妈逼随机就这么容易随到的啊 anaconda代理问题 设置代理的方法:找到位置在path-for-install目录下.condarc文件,添加Http和Https的代理,这里默认本地cfw
1 2 3 proxy_servers: http: http://127.0.0.1:7890 https: http://127.0.0.1:7890
如果有密码的话
1 2 3 proxy_servers: http: http://user:password@xxxx:8080 https: https://user:password@xxxx:8080
1 anaconda 并不能被Clash4Windows在Tun模式下代理,虽然不知道原因(后续知道了会在这补上),anaconda只能在配置了proxy之后才能被代理流量
python和Clash4windows的冲突问题 现象: 和pip有关的几乎一切指令都会报错
1 2 3 4 WARNING: Retrying (Retry(total=4, connect=None, read=None, redirect=None, status=None)) after connection broken by 'ProxyError('Cannot connect to proxy.', OSError(0, 'Error'))': /simple /gitpython/ WARNING: Retrying (Retry(total=3, connect=None, read=None, redirect=None, status=None)) after connection broken by 'ProxyError('Cannot connect to proxy.', OSError(0, 'Error'))': /simple /gitpython/
ts:
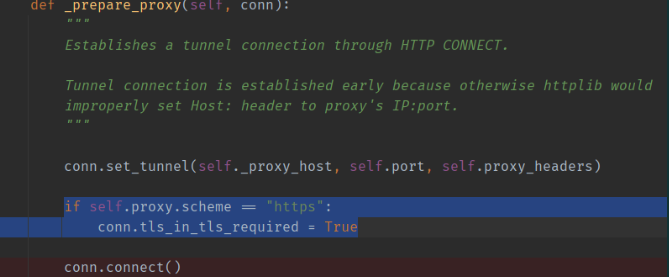
遇到这种问题那肯定是直接debug走起,首先用文本搜索到抛这个错的函数,然后在嫌疑语句上都打上断,我们就能找到罪魁祸首:
同时发现windwos中原生的python环境并没有这个问题,于是和venv外没问题的老版pip一比较,很容易就能发现不对劲:选中的那两行在老版是不存在的
有了这个额外信息,我们很容易就能找到这个 Support for web proxies is broken in pip 20.3 · Issue #9190 · pypa/pip (github.com) 来说明问题,2016年底,curl加入了这个把https协议前缀另加解释与定义的联盟:HTTPS proxy with curl | daniel.haxx.se ,而urllib3显然也跟上了这个脚步:
因为前缀设置了 tls_in_tls_required 之后,urllib3会企图把这个代理服务器看作一个套了tls的http CONNECT代理。https:// 前缀的代理服务器,这个行为是什么神奇的情况呢?
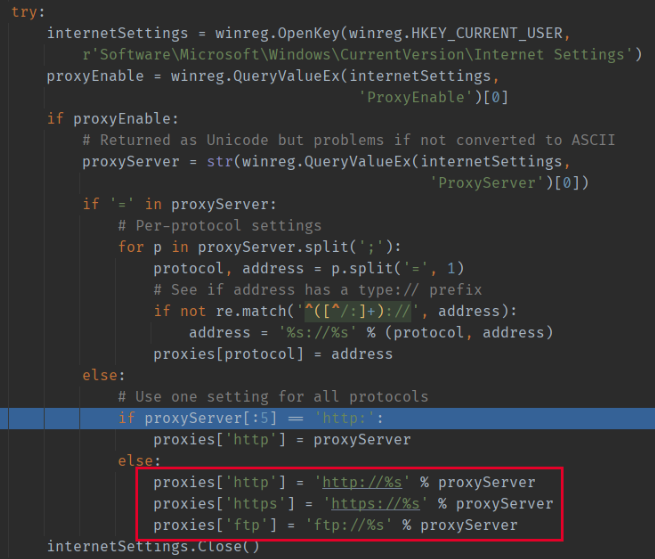
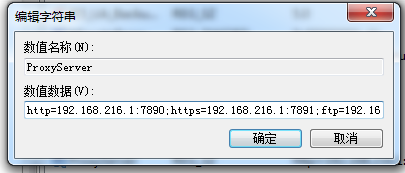
确实,env里面没有proxy,那按照windows的习俗找找注册表也情有可原对吧?
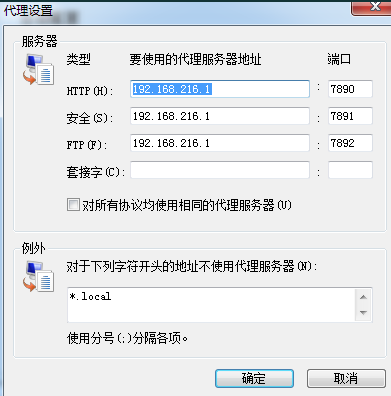
看红框的行为是不是好像很眼熟?IE的代理设置似乎就是这样的?
不,并不是一样的,因为IE的代理设置把HTTPS(在zh-MS方言里叫安全)代理定义为支持 CONNECT 动词的HTTP代理,尽管很久以来人们都是这样用的,但是当它前面出现一个协议前缀的时候就不一样了。
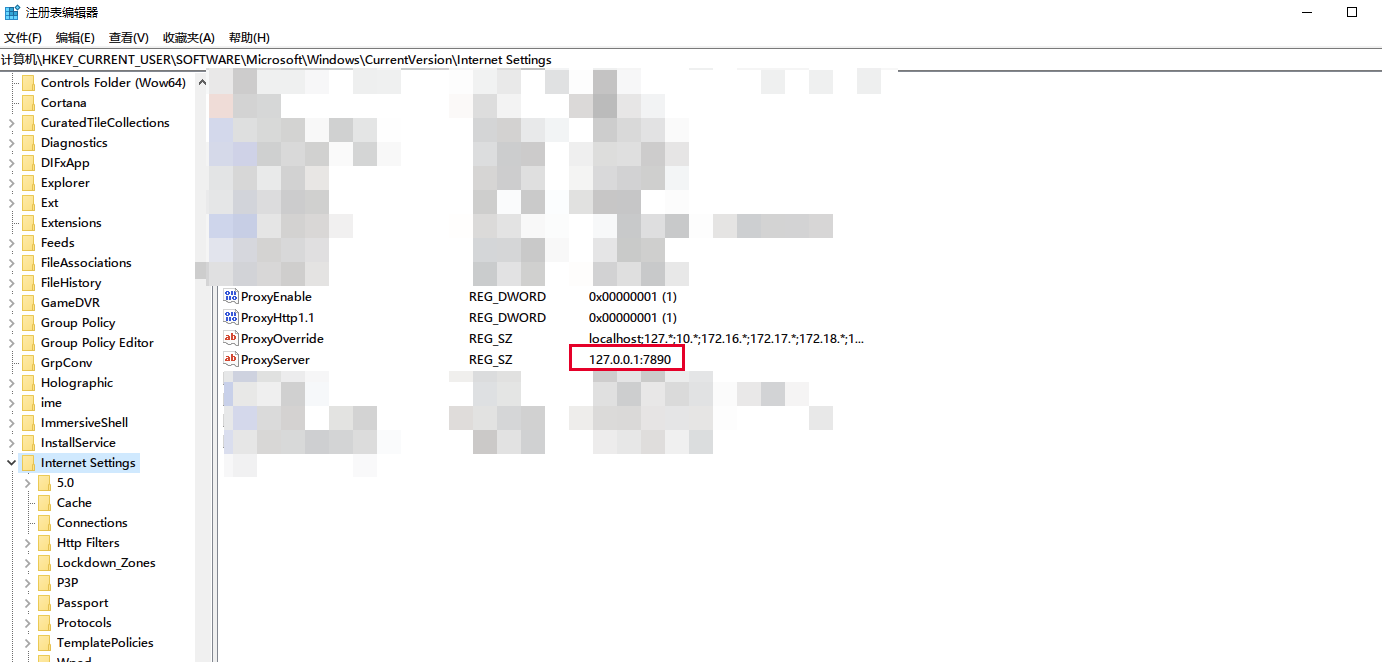
因为clash for windows打开系统代理的代理配置看起来并没有写明了protocol:
所以首先,我们的py会根据IE时代的约定俗成把这样一个没有指明protocol的proxy url自动补全三种协议 ,然后再按照约定俗成的行为为https请求使用https_proxy ,最后在一个http代理上试图开tls 。
这个配置在IE时代行为会是正常的,在现代的库中行为也是正常的,但是对于这样一个混杂了两种行为的库,模糊不清就成了问题。
似乎此问题在新版Python中的报错信息会变成 There was a problem confirming the ssl certificate: HTTPSConnection
Pool(host='pypi.org', port=443): Max retries exceeded with url: /simple/plotly/ (Caused by SSLError(SSLEOFError(8, 'EOF
occurred in violation of protocol (_ssl.c:1123)'))) 或者类似的错误。
在后续的版本更新中,CFW解决了Specify Protocol解决了部分此问题,但是解决的并不是很好,启用Specify Protocol会导致只设置http代理,https无代理。
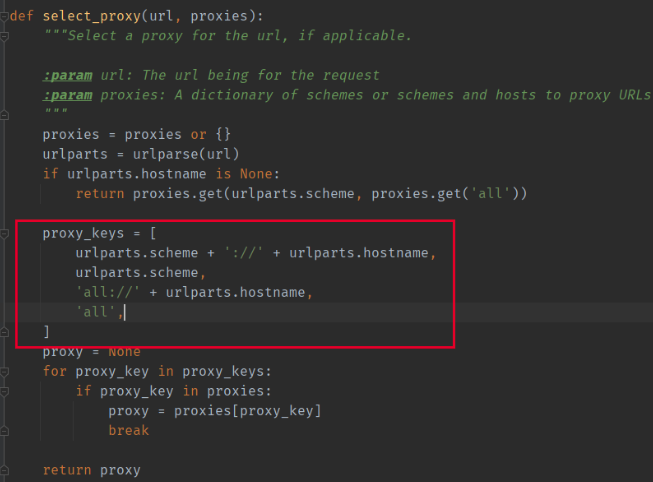
可以看到如果只是单纯地把注册表项的内容由 127.0.0.1:7890改为http://127.0.0.1:7890的话,urllib只会返回一个只有一个key也就是http的代理dict。requests/utils.py的select_proxy函数:
因为红框中的部分的限制,当你请求https://pypi.org的时候,只有key为https/https://pypi.org/all/all://pypi.org的代理会被使用,上面那个http的代理自然也就不会被使用。
同时,因为urllib中还存在代理的类型推测代码,所以正确的设置应该是:http=http://127.0.0.1:7890;https=http://127.0.0.1:7891
python和解释性语言 https://blog.csdn.net/balabalamerobert/article/details/1649490

